


The article covers a guide on setting up TLS/Mutual TLS (mTLS) for securing communication between Kafka clients and servers, specifically in a Kubernetes environment, thus mitigating potential threats such as man-in-the-middle attacks and unauthorized access to data. We'll be starting off by diving into a bunch of topics that'll help you understand why we're doing what we're doing for our setup.
If you're all set and eager to dive into the setup, go ahead and head straight to this section, here. But hey, if you're feeling a bit rusty or want to brush up on the basics, it wouldn't hurt to take a moment to check out the provided refreshers (it might mean reading through some extra text, but it'll be worth it).
Before plunging in, let's ponder some basics. Why are we here? What even is the need for this? and, (if this isn't a use case you're involved with currently) How would this ever prove out to be a useful piece of resource for you?
1. Why are we here?

Well that ☝️, and to create a secure line of communication between Kafka Clients and Servers, think of it like building a fortress around your data so that no sneaky middlemen can sneak a peek. 'Cause if they do, boy could we be in trouble.
2. What even is the need for this?
Data security is a prime priority for any company out there. Mind you, a data leak isn't just another little hiccup. Not only can it be a reputation-shattering event for your company, it can also get you the exit ticket that might actually be long due for you, *cough cough, imposter syndrome*. The responsibility of making sure that your data does not fall into the wrong hands, falls squarely on your shoulders as a developer, whether it's officially on your to-do list or not.
3. How could this ever prove out to be useful for you?
Picture this: in today's world, speed matters just as much as the data itself. The faster you can serve up insights, the happier your users. And where does Kafka fit into all of this? It is currently the foremost choice for low-latency, real-time data delivery use cases. Thus, making sure those Kafka convos stay under lock and key is a win-win for everyone involved.
With the fundamentals sorted, let's move on to what are some potential threats to your data, if there are no security measures in place.
Man-in-the-middle attack
An MITM attack refers to a scenario where an attacker intercepts and potentially alters the communication between Kafka brokers and clients. This interception can occur when data is transmitted over an insecure network, without proper encryption or authentication mechanisms in place.

Here's how MITM attacks can rain on your Kafka parade:
Interception of Data, Data Leaks: An attacker positioned between a Kafka broker and client can intercept the data transmitted between them. This intercepted data could include sensitive information such as messages, authentication credentials, or configuration details.
Data Manipulation: In addition to intercepting data, an attacker could modify the messages exchanged between Kafka brokers and clients. For instance, they could inject malicious content into the messages, alter message payloads, or even impersonate legitimate clients or brokers.
Identity Spoofing: Without proper authentication mechanisms like Mutual TLS (mTLS) in place, an attacker could impersonate either the Kafka broker or the client. It's like someone showing up to your party wearing your friend's face —creepy and definitely not cool. This could lead to all sorts of unauthorized access and data leaks.
Denial of Service (DoS): An attacker could launch an MITM attack with the intention of disrupting the communication between brokers and clients, leading to a denial of service. By intercepting and blocking messages or flooding the network with malicious traffic, the attacker can prevent legitimate clients from accessing Kafka topics or publishing/consuming messages, like someone pulling the fire alarm just as the party's getting started — major buzzkill!
Moving on, the most foolproof way to prevent all of the above and secure communication channels between Kafka servers and clients is to enable TLS/mTLS authentication.
TLS might ring a bell, but if you're not entirely sure what it entails, no biggie, here's a quick refresher:
TLS/mTLS 101:
Transport Layer Security (TLS) is a widely used encryption protocol across the Internet. Initially known as SSL (Secure Socket Layer), TLS performs two crucial functions in a client-server connection.
Firstly, it authenticates the server, ensuring the client can trust its identity.
Secondly, it encrypts the communication between the client and server, preventing unauthorised third parties from eavesdropping on the transmitted data.
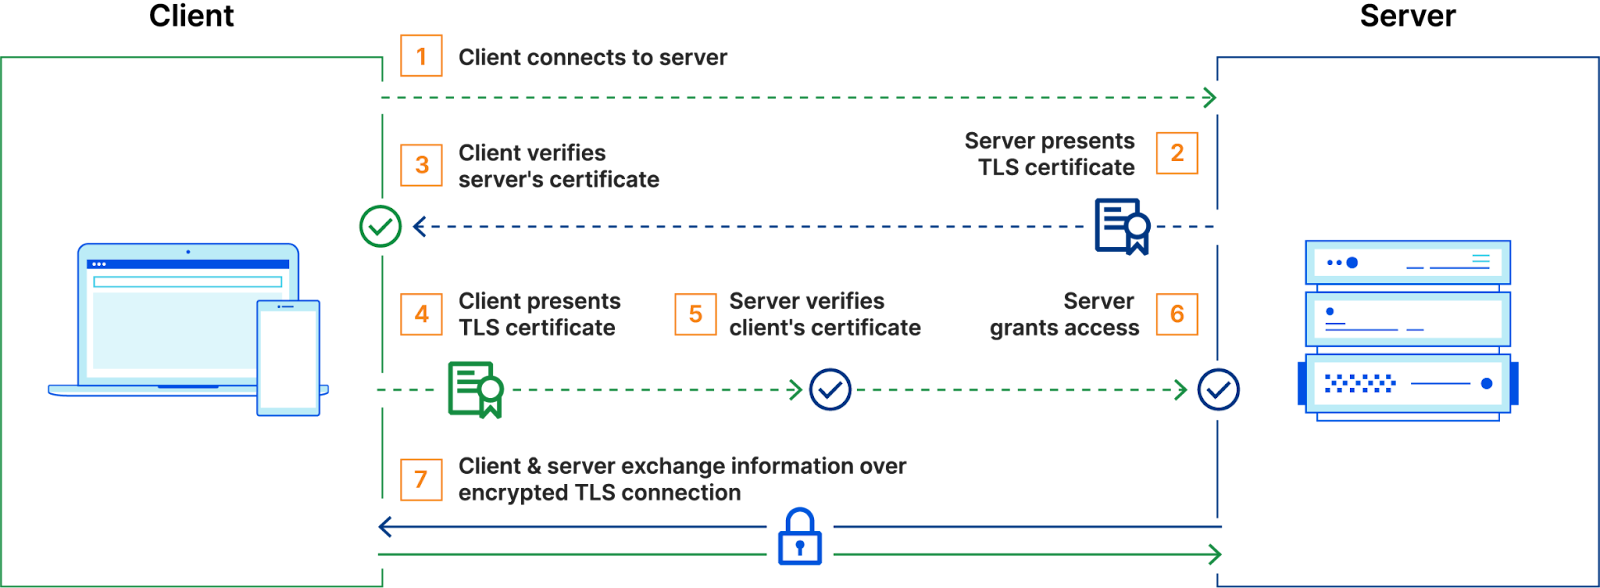
Here’s how TLS works:
Client connects to server
Server presents its TLS certificate
Client verifies the server's certificate
Client and server exchange information over encrypted TLS connection

mTLS, on the other hand stands for Mutual Transport Layer Security wherein both server and client verify each other’s certificates for an even more secure connection.
Client connects to server
Server presents its TLS certificate
Client verifies the server's certificate
Client presents its TLS certificate
Server verifies the client's certificate
Server grants access
Client and server exchange information over encrypted TLS connection
Well, what is it with the client and server sharing their TLS certificates with each other you may wonder. What are these certificates about, how do they work?
There you go, another 101 on TLS certificates.
TLS Certificates
First and foremost, TLS relies on a PKI (Public Key Infrastructure) framework. This framework involves a Certificate Authority (CA), which is a trusted entity that issues digital certificates. The certificates in turn are used to validate an entity’s authenticity. Here’s how the process works:

First things first, an entity like a server or client makes a certificate for itself. This certificate has a public key and a private key that go together.
At this point, the certificate can be created by anyone and isn't validated by a trusted entity yet. As mentioned earlier, Certificate Authorities are the trusted entities who sign your certificates and give them the green light for actual use in communications.
In order to get your certificate signed by a CA, you will be creating a Certificate Signing Request (CSR). The CSR would contain your public key along with some other details about your domain.
The CA would then validate your CSR and sign it using its own Private Key.
And there you would have it, a signed certificate that you can subsequently use for the connection setup.

Enough said, that covers all the prerequisites we needed to address to avoid getting lost while setting all of this up. Time to buckle down and get straight into it!
Setting up TLS Authentication on Kafka Deployed on Kubernetes
- For skipping Kubernetes setup and directly configuring client-side Kafka (outside K8s) : Refer this
The following setup includes installing Kubernetes, deploying Kafka using Strimzi Operator, and configuring authentication for secure communications between kubernetes-deployed kafka and an external kafka (client) node.
Installing Single Node Kubernetes:
To install a single-node Kubernetes cluster, follow along:
1. Run the following command to install k3s:curl -sfL https://get.k3s.io | sh -
2. Check the status of k3s to ensure successful installation:systemctl status k3s
3. Set up Kubernetes configuration:
rm -rf ~/.kube
mkdir ~/.kube
sudo chmod 755 /etc/rancher/k3s/k3s.yaml
cp -pr /etc/rancher/k3s/k3s.yaml ~/.kube/config
4. Verify Kubernetes installation and system pod functionality:
kubectl get nodes
kubectl get all -n kube-system
Installing Helm
Helm is a package manager for Kubernetes, just like apt is for Ubuntu.
Just as apt makes it easy to install, upgrade, and handle software packages on Linux, Helm makes deploying and managing applications on Kubernetes clusters a breeze. It offers a higher-level abstraction and a range of tools to manage Kubernetes manifests.
To install Helm version 3.8.0, execute the following commands:
curl -fsSL -o get_helm.sh https://raw.githubusercontent.com/helm/helm/main/scripts/get-helm-3
chmod 700 get_helm.sh
DESIRED_VERSION=v3.8.0 ./get_helm.sh
Deploying Strimzi Operator and Kafka Cluster
Strimzi Operator simplifies the management of Apache Kafka clusters on Kubernetes.
It also cuts down the efforts required from our end by setting everything up on server side. Which leaves us with configuring security on only the client side of the system.
To deploy Strimzi Operator and Kafka cluster, use the following Helm commands:
helm repo add strimzi https://strimzi.io/charts/
helm repo update
helm install strimzi-operator strimzi/strimzi-kafka-operator
The above commands add strimzi chart to helm’s list of charts (repositories), and subsequently installs the operator.
To verify the installation of Strimzi Operator:kubectl get all
The above command should return a pod and deployment starting up for Strimzi-Operator. Wait for the pod and deployment to start running.
Deploying Kafka Cluster
- Create a Kafka configuration file (e.g., kafka.yaml) with the desired specifications:
# kafka.yaml
apiVersion: kafka.strimzi.io/v1beta2
kind: Kafka
metadata:
  name: kafka-cluster-3
spec:
  kafka:
 version: 3.6.0
 replicas: 1
 resources:
  requests:
    memory: 2G
    cpu: "2"
  limits:
    memory: 4G
 listeners:
  - name: plain
    port: 9092
    type: internal
    tls: true
  - name: tls
    port: 9093
    type: internal
    tls: true
  - name: external
    port: 9094
    type: nodeport
    tls: true
    authentication:
      type: tls
 config:
  offsets.topic.replication.factor: 1
  transaction.state.log.replication.factor: 1
  transaction.state.log.min.isr: 1
  default.replication.factor: 1
  min.insync.replicas: 1
  inter.broker.protocol.version: "3.6"
 storage:
  type: persistent-claim
  size: 10Gi
  deleteClaim: true
  zookeeper:
 replicas: 1
 storage:
  type: persistent-claim
  size: 2Gi
  deleteClaim: true
 resources:
  requests:
    memory: 512M
    cpu: "1"
  limits:
    memory: 512M
Enabling TLS/mTLS on Kubernetes Kafka Cluster:
In the above yaml file, for TLS to be enabled, make sure that tls is set to true for all listeners.
For mTLS to be enabled, add the following configuration for the external listener(s):
authentication: type: tlsDeploy/Apply the Kafka configuration using the yaml file above:
kubectl apply -f kafka.yaml
Configuring Client Side TLS/mTLS Authentication
Requirements and Configurations:
While using Strimzi-Operator (with default settings) for setting up Kafka on Kubernetes, Strimzi takes care of server side authentication configurations with relevant certificates.
As stated previously, this leaves us with managing client side configurations, that include setting up client side Truststore and Keystore.

Here's everything you need to know about Truststores and Keystores:
A Keystore is like a safe where you keep your own secret keys and certificates. When you’re setting up a TLS connection, you use the keystore to store your server's private keys and the certificates that prove its identity to others. Think of it like carrying your ID and house keys; you need them to prove who you are and to access your stuff.
A Truststore, on the other hand, is more about deciding whom to trust. It’s like a contact list on your phone where you store certificates from other entities that you trust. In the context of TLS, a truststore contains certificates from trusted certificate authorities (CAs). These help your application verify that it's talking to the right server or client, similar to checking a caller ID before you answer a call.
Both play a role in making sure that data exchanged over the internet is secure and that everyone knows they are communicating with the right person or server.
For TLS:
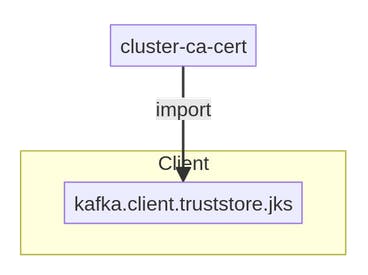
Truststore setup on client side with CA’s Certificate is all that is needed for enabling TLS. The CA’s Certificate needs to be fetched from Kubernetes by accessing Kubernetes secrets and subsequently added to the client truststore.
Steps Required:
- Use the following command for retrieving CA Certificate (stored as Kubernetes Secret) from Kubernetes Kafka cluster:
kubectl get secret <kafka-cluster-name>-cluster-ca-cert -o jsonpath='{.data.ca\.crt}' | base64 --decode > ca.crt
Here, the kafka-cluster-name corresponds to Metadata.Name in the yaml file.
The kubernetes secret we are accessing is cluster-ca-cert.
Generate the truststore using the above CA certificate:
keytool -import -trustcacerts -alias root -file ca.crt -keystore truststore.jks -storepass password -noprompt
- Updating Client Properties:
Update theconfig/client.propertiesfile in the kafka directory with the following settings:
security.protocol=SSL
ssl.truststore.location=/path/to/truststore.jks
ssl.truststore.password=password
ssl.endpoint.identification.algorithm=
For mTLS:
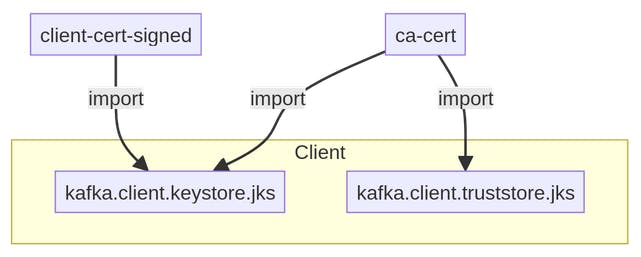
For enabling mTLS, in addition to creation of truststore, a keystore is required to be created as well.
The keystore would contain the following:
- Client certificate, signed using CA Certificate and CA Private key (fetched from a different Kubernetes Secret as compared to the CA certificate fetched for the truststore above).
In order to fetch the CA Certificate and Private key, the following kubernetes secrets are to be accessed:
For CA Certificate: clients-ca-cert
For CA Private Key: clients-ca
- Client CA Certificate (mentioned above).
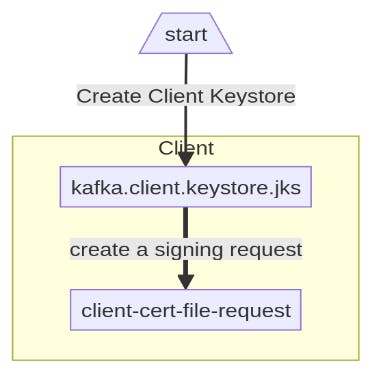
Following would be the flow for setting up the keystore as described above:
Setup Client Keystore (contains client certificate and private key), subsequently, generate a CSR for the client certificate.
Sign the above CSR using CA Certificate and Private Key.

- Create a Key store with the Client Signed Certificate and CA Certificate.
Steps Required:
The same truststore that was created for TLS can be used here.
Use the following commands for retrieving Client CA Certificate and CA Private Key (stored as Kubernetes Secrets) from Kubernetes Kafka cluster:
 kubectl get secret <kafka-cluster-name>-clients-ca-cert -o jsonpath='{.data.ca\.crt}' | base64 --decode > client-ca.crt

 kubectl get secret <kafka-cluster-name>-clients-ca -o jsonpath='{.data.ca\.key}' | base64 --decode > client-ca.key
Generate the client keystore (in ssl directory) using the following command:
keytool -keystore ssl/kafka.client.keystore.jks -alias client -validity 365 -genkey -keyalg RSA -storepass passwordGenerate a CSR (Certificate Signing Request) from the above client keystore:
keytool -keystore ssl/kafka.client.keystore.jks -alias client -storepass password -certreq -file ssl/client-cert-fileSign the CSR using the client CA Certificate and CA Private Key:
openssl x509 -req -CA client-ca.crt -CAkey client-ca.key -in ssl/client-cert-file -out ssl/client-cert-signed -days 365 -CAcreateserial
Voilà! Now you've got a signed certificate ready to roll for the rest of the setup.

All that remains to be done, is to add the signed certificate along with the CA certificate to our keystore. Let's continue.
Import/Add Client CA Certificate to Client Keystore:
keytool -keystore ssl/kafka.client.keystore.jks -alias CARoot -storepass password -importcert -file client-ca.crt -nopromptImport/Add Signed Client Certificate to Client Keystore:
keytool -keystore ssl/kafka.client.keystore.jks -alias client -storepass password -importcert -file ssl/client-cert-signed -nopromptUpdating Client Properties:
Update theconfig/client.propertiesfile in the kafka directory with the following settings:security.protocol=SSL ssl.truststore.location=/path/to/truststore.jks ssl.truststore.password=password ssl.keystore.location=/path/to/kafka.client.keystore.jks ssl.keystore.password=password ssl.endpoint.identification.algorithm=Anddd...

There you go, this marks the setup complete!
The rest of the article explains how brokers can be produced to/consumed from, now that the setup is done.
Creating/Deleting/Listing Topics, Consuming and Producing from Kubernetes Kafka Brokers:
Steps Required:
- Getting Bootstrap Server Details:
To retrieve the bootstrap server details for the Kubernetes Kafka cluster, use the following command and copy the bootstrap server along with port for external listener:
kubectl describe kafka <kafka-cluster-name>
A. For Creating/Deleting/Listing topics, use the following commands:
./bin/kafka-topic.sh --bootstrap-server <bootstrap server and port copied in step 1> —-list --command-config config/client.properties
B. For Producing data to a topic:
./bin/kafka-console-producer.sh --bootstrap-server <bootstrap server and port copied in step 1> --topic <topic name> --producer.config config/client.properties
C. For Consuming data from a topic:
./bin/kafka-console-consumer.sh --bootstrap-server <bootstrap server and port copied in step 1> --from-beginning --topic <topic name> --consumer.config config/client.properties
Additional Notes
Security Best Practices: Handling Secrets and Private Keys
When it comes to setting up TLS/mTLS with Kafka, the safety dance doesn’t just stop at configuring all those tricky certificates and keystores. Oh no, it’s also about keeping those secrets, well, secret. Because let's face it, handling private keys and secrets with the carelessness of leaving your car keys in the ignition isn’t exactly a recipe for security success.
This part right here could easily be the most crucial bit of the article. Messing up how we handle keys could ruin all the hard work we've done to get this whole thing up and running.
Secrets generated by the Cluster Operator:
The Cluster Operator generates the following certificates, which are saved as secrets in the Kubernetes cluster. Strimzi uses these secrets by default.
The cluster CA and clients CA have separate secrets for the private key and public key.
- <kafka-cluster-name>-cluster-ca
Contains the private key of the cluster CA. Strimzi and Kafka components use the private key to sign server certificates.
- <kafka-cluster-name>-cluster-ca-cert
Contains the public key of the cluster CA. Kafka clients use the public key to verify the identity of the Kafka brokers they are connecting to with TLS server authentication.
- <kafka-cluster-name>-clients-ca
Contains the private key of the clients CA. Kafka clients use the private key to sign new user certificates for mTLS authentication when connecting to Kafka brokers.
- <kafka-cluster-name>-clients-ca-cert
Contains the public key of the clients CA. Kafka brokers use the public key to verify the identity of clients accessing the Kafka brokers when mTLS authentication is used.
Additional Resources
Apache Kafka : https://kafka.apache.org/documentation/
Kubernetes : https://kubernetes.io/docs/setup/
Strimzi Operator (Kafka on K8s):https://strimzi.io/docs/operators/latest/overview
Strimzi Security Setup :https://github.com/strimzi/strimzi-kafka-operator/tree/main/documentation/modules/security
Helm for Kubernetes :https://helm.sh/docs/